
Article details
Think about any flawlessly machined metal component—a sleek piston inside a high-performance engine, the precision spindle of a CNC machine, or even the metallic body of your smartphone. Before they became beautifully finished products, they were raw, blocky chunks of metal.
How do we carve complex shapes out of materials as tough as titanium or steel? We use a remarkably simple yet endlessly sophisticated wedge called the Single-Point Cutting Tool. It is the absolute cornerstone of lathe turning, shaping, and planing operations.
Anatomy of a Cutting Edge
Unlike a drill bit or a milling cutter (which sport multiple cutting edges spinning simultaneously), a single-point tool uses one dedicated cutting edge to slice a continuous ribbon of metal—known as a chip—off a rotating workpiece.
While it looks like a basic metal bar from afar, up close it is a carefully calculated masterclass in geometry.
The Secret Weapon: Tool Signature
If you look at the blueprint of a single-point cutting tool, you’ll find a sequence of numbers known as the Tool Signature (usually following the ASA system). This string of angles dictates exactly how the tool will cut, how long it will last, and what kind of surface finish it leaves behind.
Understanding these core angles is what separates an amateur machinist from a pro:
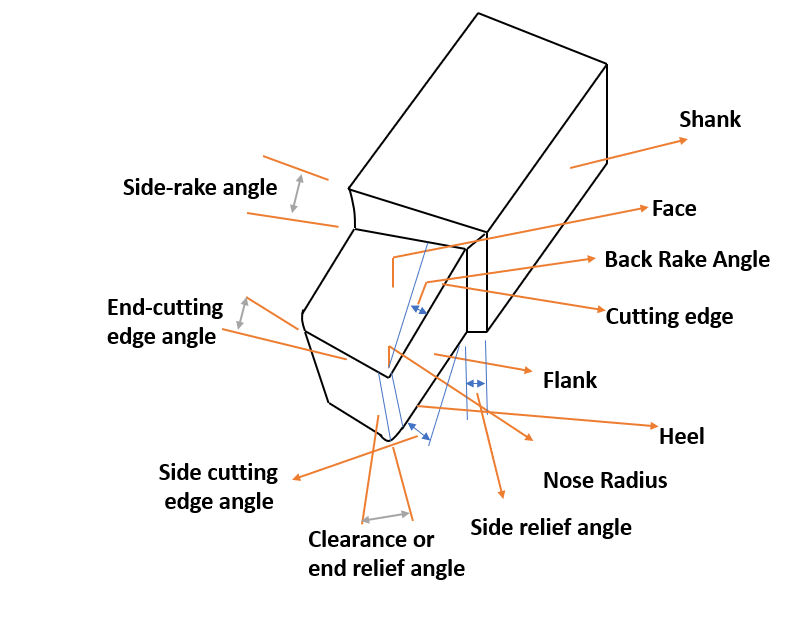
1. Rake Angles (Back & Side)
The rake face is the top surface of the tool where the freshly sliced metal chip slides off.
Back Rake Angle: Guides the chip away from the machined surface.
Side Rake Angle: Controls the direction of chip flow across the tool.
A positive rake angle makes the tool sharper and reduces cutting force, but makes the tip brittle. A negative rake angle strengthens the edge for brutal, heavy-duty cuts on hard metals.
2. Relief / Clearance Angles (End & Side)
As the tool digs into a spinning workpiece, the flanks of the tool must never rub against the freshly cut metal. Rubbing creates extreme friction, melting the tool tip and ruining the finish. Relief angles tilt the flank faces away from the workpiece, ensuring only the microscopic cutting edge makes contact.
3. Cutting Edge Angles (End & Side)
Side Cutting Edge Angle: Prevents the tool from taking the full brunt of the impact all at once when entering a cut, gradually distributing the load.
End Cutting Edge Angle: Keeps the trailing edge of the tool clear of the finished workpiece surface.
4. Nose Radius
The very tip of the tool where the side and end cutting edges meet is rounded off into a curve called the Nose Radius. A larger nose radius dramatically improves the surface finish of the metal (leaving it smooth rather than ridged) and strengthens the tip against breaking. However, make it too large, and the tool will start to chatter and vibrate violently.
The Core Materials: From Steel to Diamonds
A cutting tool has to be significantly harder than the material it is cutting, even when rubbing creates temperatures exceeding 800C. The material choice defines the tool's speed limits:
High-Speed Steel (HSS): Tough, inexpensive, and easily ground into custom shapes on a bench grinder. Great for hobbyists, but softens at high temperatures.
Tungsten Carbide: The industrial standard. Incredibly hard and heat-resistant, carbide inserts allow machines to cut metals at blistering speeds.
Ceramics & CBN (Cubic Boron Nitride): Used for machining ultra-hard aerospace alloys where standard steel tools would melt instantly.
Diamond (PCD): The ultimate hard edge, used for achieving a mirror-like finish on non-ferrous metals like aluminum and brass.
The Mechanics: How Metal Actually "Cuts"
It might look like a knife slicing through butter, but on a microscopic level, metal cutting is actually a localized structural failure.
The cutting tool exerts an immense compressive force on the workpiece. This force induces severe shear stress along a plane ahead of the tool tip. The metal exceeds its ultimate shear strength, plastically deforms, and slides upward over the rake face of the tool as a continuous or segmented chip.
By mastering the geometry of the single-point cutting tool, manufacturing engineers ensure this failure happens perfectly smoothly, day in and day out, sculpting the modern world one chip at a time.

