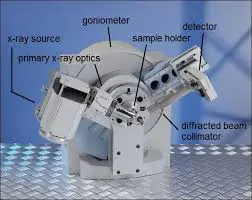
Powder X-ray Diffractometer: Theory and Lab

- Lifetime access
- Certificate of completion
- Foundational Learning
- Access to Study Materials
What enrolled engineers say
Used this to sanity-check assumptions our team had locked in before touching prod data, and it did that job. The Bragg–Brentano geometry section plus the NaCl peak indexing lab stuck; seeing how mis-set zero shifts fake symmetry was useful, and I’ve already noted it back in our repo and obs docs. It's beginner-paced, mostly fine, though I wasn't sold on how fast Rietveld refinement was skimmed, especially for pharmaceutical polymorphs. came out with cleaner opinions on what to trust, not just more slides.
Needed a clearer mental model of what’s happening inside the box, not just which buttons to press, and this course mostly hit that for a beginner. The moment that stuck was the walk-through of Bragg’s Law tied directly to the zero‑shift correction demo in the lab, where you tweak the offset and watch peaks drift in real time. The Debye–Scherrer ring indexing section felt like reading arch diagrams for infra; once I saw how scan rate (they even call out RPS) messes with peak width, my lab notes got tighter and my obs actually lined up. I wasn't sold on the Rietveld intro—it moved fast, and I wished there was a quick checklist or a repo-style summary I could PR into my notebook later. it’s already helped when talking through polymorph ID in a pharma context, especially when someone asks why a setting isn’t prod-safe yet. I’ve got better language now to defend choices without hand-waving.
Your instructor
Team ChemEE
Consultant
Is this course for you?
You should take this if
- You work in Pharmaceutical & Healthcare
- You're a Chemical & Process / Metallurgy & Material Science professional
- You prefer self-paced learning you can revisit
You should skip if
- You need a different specialisation outside Chemical & Process
- You need live interaction with an instructor
Course details
Course suitable for
Key topics covered
Course content
The course is readily available, allowing learners to start and complete it at their own pace.
- X-ray Diffractometer- Theory5 min
- XRD- Lab5 min
Opportunities that await you!
Career opportunities
Certifications
Why people choose EveryEng
Industry-aligned courses, expert training, hands-on learning, recognized certifications, and job opportunities-all in a flexible and supportive environment.
What learners say about this course
Used this to sanity-check assumptions our team had locked in before touching prod data, and it did that job. The Bragg–Brentano geometry section plus the NaCl peak indexing lab stuck; seeing how mis-set zero shifts fake symmetry was useful, and I’ve already noted it back in our repo and obs docs. It's beginner-paced, mostly fine, though I wasn't sold on how fast Rietveld refinement was skimmed, especially for pharmaceutical polymorphs. came out with cleaner opinions on what to trust, not just more slides.
Needed a clearer mental model of what’s happening inside the box, not just which buttons to press, and this course mostly hit that for a beginner. The moment that stuck was the walk-through of Bragg’s Law tied directly to the zero‑shift correction demo in the lab, where you tweak the offset and watch peaks drift in real time. The Debye–Scherrer ring indexing section felt like reading arch diagrams for infra; once I saw how scan rate (they even call out RPS) messes with peak width, my lab notes got tighter and my obs actually lined up. I wasn't sold on the Rietveld intro—it moved fast, and I wished there was a quick checklist or a repo-style summary I could PR into my notebook later. it’s already helped when talking through polymorph ID in a pharma context, especially when someone asks why a setting isn’t prod-safe yet. I’ve got better language now to defend choices without hand-waving.
Needed to patch some gaps in my arch-level understanding, especially where materials choices leak into system constraints. The course isn’t fluff; it frames polymers in a way an engineer can map to tradeoffs, like the crystallinity chapter where the DSC curve example around glass transition vs melting finally clicked. I liked the section on barrier properties and permeability because it mirrors how we think about throughput and backpressure in infra, just without k8s. The sustainability angle mostly works, though I wasn't sold on the recycled polymer lifecycle slide; felt thin compared to the rest. It’s pitched oddly as advanced/beginner, which is true but also means pacing jumps; a short recap before the elastomers vs thermoplastics split would’ve helped. Still, it’s been useful context for cross-team talks with chemicalpharmaceutical folks and vendors, better questions in PRs, fewer hand-wavy assumptions in design reviews—and that’s where this stuff actually matters.
Material here maps closely to day‑to‑day dev if you’re touching hydrogen infra in prod, not just slideware. The safety module’s walkthrough of the NFPA 2 setback table, using a 700‑bar Type IV tank during transport, stuck with me because it forced tradeoffs instead of slogans. Transport sections connect modes to failure paths in a way an arch review can actually use; the pipeline vs tube‑trailer comparison read like a design PR with assumptions spelled out. I liked how obs was treated as part of safety, not an afterthought, though the RPS analogies felt a bit stretched. mostly it balances beginner and advanced content, but I wasn’t sold on the pacing—switching from intro thermals to fracture mechanics was abrupt. I’ve got notes to pull back up when we do the next arch pass, especially for energy utilities work.